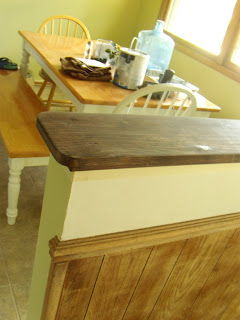
After a looooong first week at art school, I spent my Saturday relaxing by working on a project I'd been thinking about for awhile; Painting and distressing the top of the kitchen ledge. Here is what it has looked like for as long as I can remember:

Very ugly, I know. Not to mention incredibly beat up and worn. I actually made the mistake of taking the picture after I had already sanded part of it, so the above doesn't show exactly how beat up it was, but you get the idea.
Anyways, the first job was to sand the whole thing down. I used an electric sander and 120 grade sandpaper. It took a bit of time, but wasn't too hard. The harder job was cleaning up all the dust it made. Here's a shot of it after the sanding:

Turns out that after finishing the ledge I simply couldn't resist beginning the sanding on the wainscot in the other room (you can see a bit of it near the top of the picture above). It only took a few minutes to do, as I was only ruffing it up to prepare it for the primer coat.

Finishing up the sanding, I cleaned up all the dust and shook off all the blankets and things I used to cover furniture.
I started on the ledge with a coat of dark walnut stain to contrast with the rice paper white paint I was going to paint over top of it.
 Admittedly I didn't do a terribly good job with the stain, as most of it wasn't going to be seen anyways.
After I had let that dry for about an hour, I painted over it with leftover white paint. It took about two coats:
 But guess what, with just a tiny bit of white paint left in the bottom of the can, I simply couldn't resist starting another very little project I'd thought about just the other day:
The picture above is actually a drawing my great, great grandpa did. As you can imagine, it means a lot to me and my family, and I very much like it as a piece of shabby art, but the old, dark wood frame on it did absolutely nothing for me, so I took the left over paint and transformed it white:
 I, of course, distressed it, and I really like the look of it now, I can't wait to rehang it up.
Anyways, back to the ledge (I really can never seem to focus on just one project at a time :P). The last step left for the ledge was distressing it. I did my distressing while the paint was dry to the touch, but not completely dry. Mostly I just used my fingernails to scrap away the corners, etc. It works just as well as anything else I've ever tried. I did use a bit of sandpaper for the finishing touches though.
 The last little thing I did that day was find a nice little bottle I thought I might use as a vase. So at the end of the day I had a nicely distressed ledge and picture frame, and a nice little flower vase all of which I could sit back and enjoy!
If anyone has any thoughts, comments or suggestions I'd REALLY love to hear them! I'm definitely still learning about this kind of stuff so I'd appreciate anyone's help.

I think it looks great! Have you thought about painting the wainscotting (sp?) below white as well? That might tie it all together.
ReplyDeleteThanks! Yes, I'm actually in the process of priming it right now. I'll be posting an entry on it as soon as it's finished!
ReplyDeleteI'm checking out your blog right now; looks fantastic! Bookmarking.
Robby, Both the ledge and picture frame both wonderful! You did a great job on the ledge, you will enjoy that so much. The wainscotting painted white will be so beautiful, too.
ReplyDeleteHugs, Cindy S
Oh, yes...love the idea of painting the wainscoting. It looks wonderful! Great job at creating a display out of otherwise useless space! Thanks so much for linking up to style feature saturday today! -shaunna :)
ReplyDeleteI love the fact that you have the art from your great, great grandpa framed. So touching. The frame looks so much better in distressed white. Looking forward to seeing all come together.
ReplyDelete